Sunday, April 10, 2022

CHAPTER 2 - - - SETTING UP SHOP

 The first thing you need to do is set up your shop. Your needs will vary from mine, so let's call this the 'idea' chapter.

One thing to consider: Many of these items are 'buy once' items. Take care of your tools, and you won't have to replace them. Also keep in mind that many of the tools I mention here, you may already own. As far as parts go, BUY IN BULK.

We are staring with a list of some large items you may need. Then on the next page we will list actual part numbers along with a link to where I purchase those parts.

It will be my MASTER parts list for the Mixer and other items I have purchased over the years. Any prices I post will be correct AT THE TIME OF POSTING. Thanks to Grandpa In Chief you never know how high things will get.

I buy a lot of items on AMAZON. Since I am a PRIME member, we usually get free shipping.

This way, I don't have to wait for a huge order with one of the other stores in order to get free shipping. That, and I usually get the AMAZON items the next day.

NOTE: ALL ELECTRONICS orders get to me in three days, That's not bad. I highly recommend them. (NOTE: Unfortunately, they closed in 2023) I also buy from Digi-Key and JAMECO.

My old workshop. (Kitchen cabinets under construction)

The most important item in your shop will be THE LIGHTING.

You have to be able to SEE in order to build.

I use a standard 4 foot LED shop light. It works well and is bright enough to land a 747 on Runway 12R.

A good comfy chair is also needed. Since I set up my shop in my Ham Radio Room, I already had a nice chair.

I also have a nice head worn magnifier. I have serious vision issues and a magnifier is the only thing that allows me to see well enough to solder circuit boards.

NOTE: These items are NOT listed in ANY order. And these links DID work at the time of posting.


Full disclosure: I also have a well stocked wood working shop in the garage. I can also cut and shape metal if needed. 

The shop we are setting up is strictly for building electronic circuits.

Now for the tools of the trade.

You do not need a ton of tools. So let's keep it simple.
----------------------------------------------------------------------------------------------
SOLDERING  -  A 20 to 30 watt pencil soldering iron should do the job.

Picture for illustration only. I have not used/evaluated this particular product.
----------------------------------------------------------------------------------------------
Also some ROSIN Core solder. Do NOT use Acid Core. I have two different sizes of solder.  (.025 and .050) You should also have a way to de-solder your work. (You will not only make a mistake or two, but you will also want to make modifications) I use a "solder wick" for this job, as well as a 'solder sucker'.
----------------------------------------------------------------------------------------------
Here is a soldering station I just purchased.

 ----------------------------------------------------------------------------------------------
And some extra tips (fine)


----------------------------------------------------------------------------------------------
----------------------------------------------------------------------------------------------
SOLDER SUCKER

       Picture for illustration only. I have not used/evaluated this particular product
----------------------------------------------------------------------------------------------
CORDLESS SOLDERING IRON 
AMAZON 
   

----------------------------------------------------------------------------------------------
TEST EQUIPMENT - You do not need much. Start with a cheap V.O.M. (Volt-Ohm Meter) Go with what your budget can stand. You can always upgrade later. 
----------------------------------------------------------------------------------------------
----------------------------------------------------------------------------------------------
You will also need an audio source. I do have a small tone generator, but usually just use a turntable or FM Tuner.
----------------------------------------------------------------------------------------------

These inexpensive board DID NOT hold up to soldering as well as I would have liked.

The pads tended to lift off when soldering. And the holes were not centered on the pads. SO I tried the one below.  

----------------------------------------------------------------------------------------------

Yes, much better. However these are twice as much as the first example. I found that if you "carefully" monitor the heat, the first example does work better. So I use those for the first prototype and then do a final prototype with the green board shown above.
----------------------------------------------------------------------------------------------

----------------------------------------------------------------------------------------------

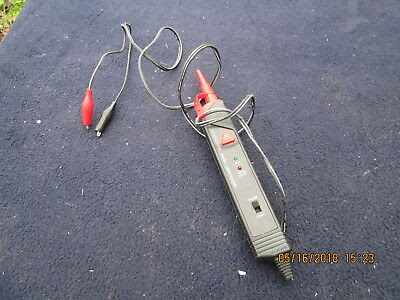
Another great tool for designing digital circuits is the LOGIC PROBE.

I have used this one for years and years.

Radio Shack is long gone, but I did find this one on Amazon. (comes as a kit.)  LOGIC PROBE KIT
----------------------------------------------------------------------------------------------
Here is another thought: You will need a FAN. Yes a fan. When you are bent over a board soldering, the fumes will get in your face. Not only annoying, but UNHEALTHY. I use a fan to keep the fumes out of my face. Here is an idea from AMAZON.
Since we live in Florida, we have a number of battery powered fans. They come in handy during Hurricane Season. I took one of those, removed the batteries, and soldered a line to my 5 V power supply. Runs perfect and does not eat D size batteries. 
 
If you don't want to modify a battery fan, here is a slightly smaller one I found that runs on battery OR your USB hub.They claim a 6 hour run time on battery alone.

 
----------------------------------------------------------------------------------------------
One last thought. And perhaps the most important of all.

ORGANIZE, ORGANIZE, ORGANIZE.

I just went through an hour of trying to find a chip. I thought I had some but could NOT find them. So I ordered some more.

While I was waiting for the chips to arrive, I figured I might as well spend some time organizing and cleaning my little bench.

Guess what I found... Yep, the missing chips.

So remember to keep your area CLEAN and ORGANIZED... You will save a ton of time in the end.

So, now we have our shop set up and organized, it's time to start playing with power supplies.

But first, let's do a MASTER Parts List for you.

That's next time. Hope you come back !!!!

Well, that gives you an overview of what we are doing here.

In CHAPTER 2a, we will give you a LONG list of parts I have ordered over the years for a mixer and other projects. Just an ADDED BONUS.

----------------------------------------------------------------------------------------------

YOU CAN NOW MOVE ON TO CHAPTER 2a - - - PARTS LIST

----------------------------------------------------------------------------------------------

God Speed, Mother Nature


.
.
.
.
.
.
The information presented here in this web site is for personal use only and may not be
 used commercially
We make no claim as to the accuracy of the information with-in. 


No comments:

Post a Comment

ANALOG VU METER BOARD

Let's talk about the Analog VU Meter Bridge. I decided to make the Meter Bridge separate from the mixer, because of limited space inside...